 Commercial


Is your sliding glass door locked? Is it secure?
Yesterday I had two very similar lockout calls. On both calls, I showed up and the customer pointed to a door at the front of the house, expecting that I would bypass the offending lock. On both calls I did a tour around the house to find an easier way in. On both calls I quickly got in through the sliding patio door. The first one was straight-up unlocked. That was easy enough. On the second house, the door was locked and I opened it in a matter of seconds without any tools.
It’s easy to leave your sliding door unlocked and let it sit like that for days or weeks. But even when it’s locked, it’s not always that secure. Patio door locks tend to be kind of dinky. Like the majority of locking doorknobs out there, they’re sufficent for keeping out toddlers and the merely curious, but not someone more determined to get in. The kind of patio door lock with two hooks is markedly better than the kind with just one, but retrofitting your door to accommodate that is not worth the trouble. There’s an easier solution.
When I look at sliding glass doors, I check for three things:
1) the dinky little lock should work (to keep out marauding toddlers);
2) should that lock fail, be defeated, or be left unlocked, there should be something in place to keep the door from sliding open;
3) there should be something in the upper part of the track (above the door) to prevent the door from being lifted directly off the track.
Assuming you already have the dinky lock in place and it works properly, the rest of the job is cheap and easy.
To prevent the door from sliding, you could buy and install a Charley Bar, which is a square aluminum rod that sits across the door at about waist level and is, in my opinion, very ugly. They also make locks that sit at floor level and secure the door with a peg that goes into a hole you’ve drilled into the track or the frame of the inactive door. Usually when I encounter these, they’re broken or the peg no longer aligns with the hole because the house has settled and shifted.
Even though it’s too simple a solution to profit handsomely from, I favor the ol’ wooden rod in the track. Specifically, I buy these cedar rods from Home Depot for $2 apiece. They’re 2″ x 2″ x 3′ and tend to fit really snugly right in the track. I’m always careful when I pick them from the pile because many of them are warped or knotted. I like to lay them on the floor to test them for straightness. When I get it to the house, I lay it next to the door and carefully mark where I need to cut it, making sure not to cut off any more than necessary. Sometimes if they sit loosely in the track, they can be flipped out of the track from outside the house.
Occasionally instead of using the cedar rod I cut down a chrome shower curtain rod and cover the ends with cane tips. It’s a lot more attractive and I charge a big markup to reward myself for my ingenuity. In my own house, the cedar rod is good enough.
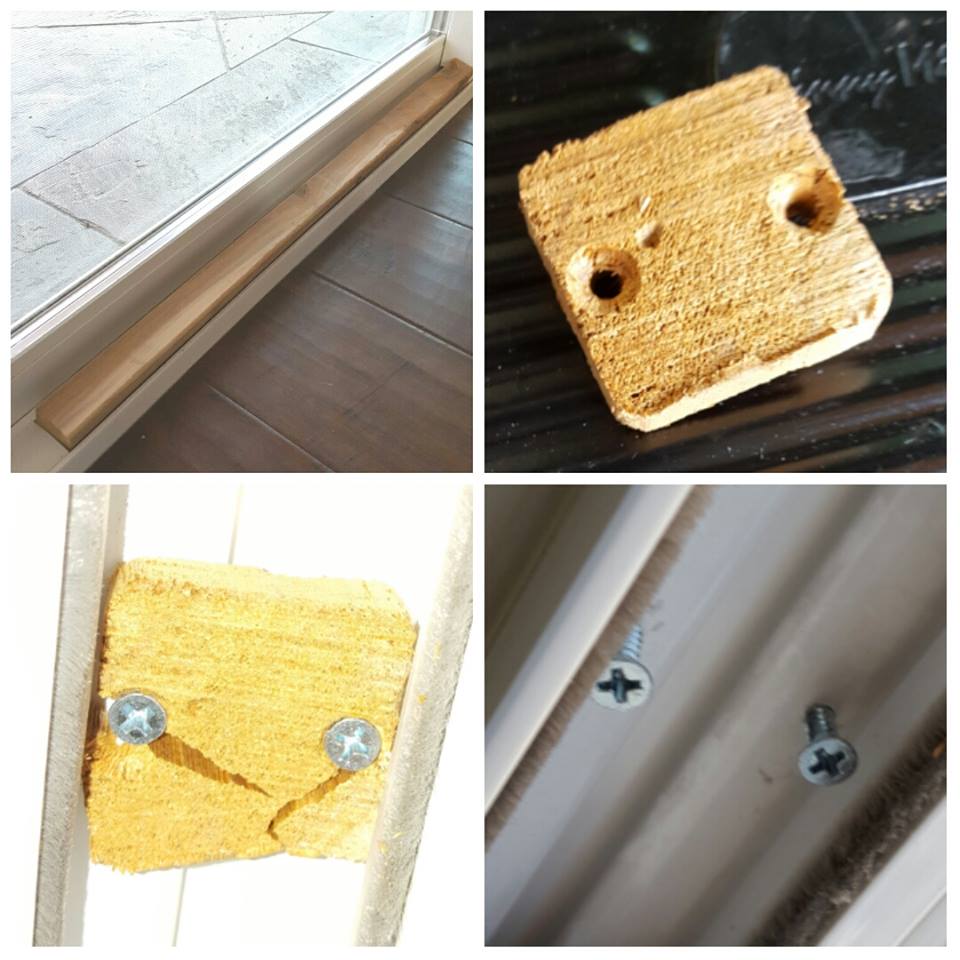
The next part of this project involves preventing the door from lifting. Check the track above the door. If you see a piece of plastic glued in there, you should go open a beer to celebrate a job well done. Otherwise, you need to put something in there. One option is to cut off a wafer from the end of the remaining cedar rod and screw that into the upper track. The space between the door and the top of the track varies between doors, but you might want the piece to be about 3/8″ thick. Cut two pieces to install above each end of the door in its closed position. Test that they’re not too thick for the door to slide past them before you do any more work. As close to the edges of the wafer as possible, drill some holes and then counter-sink them with a larger drill bit so that the screws will be flush with the surface of the wood. Again, these blocks need to extend as far down as possible without interfering with the motion of the door.
Now screw the pieces of wood into the track. Mark and pilot the holes if necessary. But if you have any sitting around, I’d recommend using 1-1/2″ self-tapping flat-head screws. If you don’t, I’d recommend just using whatever you can find. It’s not that important. You can glue them in place if you want. You can even tape them. But be careful! Cedar is soft. Screw these blocks in too tightly and they will split. Seriously, just breathing too hard around them is almost enough to make them split. If one does split, you have the option of taking the wood, throwing it away, and just leaving the screws in place. That’s a totally legitimate way of doing this project. If you do end up tossing the wood, you’ll be happy that you placed the screws as close to the edges of the track as possible, as the door is often hollow in the middle. Screws in the center of the track won’t keep anyone from lifting the door. Once the pieces are in, test the door for lift. If you can’t lift the closed door off of the track, it’s time for a beer.
Before you put too much work into this project, remember that your door is made of glass. If you were serious about home security, you would put bars on your windows and you wouldn’t have an entry point that could be bypassed with a few light blows from a hammer. You really don’t need to go overboard here, as the goal is to prevent easy break-ins. There are companies out there that will charge you an arm and a leg to put shatter-resistant film on your glass door. As I see it, the biggest benefit to this is that when someone breaks out your window it comes out in one piece and then the cleanup is easier.
As ever, we should not forget that that we all live in glass houses.